Everything you need to know about Google Ads remarketing, including how it works, how it differs from retargeting, how much it costs and how to set up your first campaign.
Google Ads remarketing lets you reconnect with past website visitors who didn’t make a purchase on their first visit. Instead of losing these leads for good, you can show them ads to remind them why they visited your site and encourage them to complete their purchase.
Effective remarketing campaigns achieve some of the highest performance metrics in Google Ads with higher CTRs and conversion rates than conventional campaigns. Above all, this is because remarketing audiences have already shown an interest in your offer.
What is Google Ads remarketing?
Google Ads remarketing is a set of advertising techniques that help you connect with people who have already visited your website. The goal is to show these visitors relevant ads based on their previous interactions with your site, which helps you focus on their specific interests and boost your chances of achieving valuable conversions.
Here’s how Google itself describes its remarketing features:
“Remarketing is a way to connect with people who previously interacted with your website or mobile app. It allows you to strategically position your ads in front of these audiences as they browse Google or its partner websites, thus helping you increase your brand awareness or remind those audiences to make a purchase.”
In most cases, remarketing involves showing users display ads as they continue to browse the web, meaning they’ll see visual ad formats on third-party websites and mobile apps. Over the years, Google has refined and expanded its remarketing offering and there are currently five types of remarketing methods you can use in Google Ads.
- Standard remarketing: Show ads to your past visitors as they browse sites and apps on the Display Network.
- Dynamic remarketing: Show ads for products and services visitors have looked at without manually creating ads for every page.
- Remarketing lists for search ads (RLSA): Show Search ads to previous visitors as they carry out follow-up searches for what they need on Google.
- Video remarketing [YouTube]: Show ads to people who have interacted with your videos or YouTube channel as they use YouTube and browse Display Network videos, websites and apps.
- Customer list & Customer Match remarketing: Reach your existing customers and people with similar online behaviours with campaigns across Search, Shopping, Gmail, YouTube and Display.
Standard remarketing in Google Ads is the traditional retargeting method of showing display ads to previous visitors as they browse third-party websites. The thing is, you have to manually create all of these ads yourself and this can be cumbersome if you have a lot of product or service pages that you want to create campaigns for.
Dynamic remarketing solves this problem by automatically creating ads for you based on the pages visitors looked at, including specific product pages. This feature dynamically creates the ads for you and includes images for products, where relevant, saving you a whole bunch of time.
Then you have remarketing lists for search ads (RLSAs) which allow you to target previous visitors with Search ads as they conduct relevant searches in Google.
Customer list remarketing helps you reach people who have already bought from you and encourage them to keep buying with targeted ads across Search, Shopping, Gmail, YouTube and Display. And you can also use Customer Match to target users who are similar to your customers, even if they’ve never bought from you, visited your website or ever even heard of your brand before.
Add all of these features together and you’ve got a powerful set of remarketing tools at your disposal in Google Ads.
What’s the difference between remarketing and retargeting?
You’ll often hear the terms remarketing and retargeting used interchangeably by advertisers but they are, technically, two different strategies. The line between the two has blurred significantly over the years but it’s worth understanding the differences between remarketing and retargeting, as this will help you apply both strategies more effectively.
If you want a simple, accurate explanation of the remarketing vs retargeting divide, here’s a good explanation from email marketing software provider Rejoiner.
- “Retargeting is most often used to describe online ad placements and display ads, served based on a user’s activity on your site.”
- “Remarketing is typically the term used to describe re-engaging customers with email.”
In other words, retargeting delivers ads to previous website visitors who didn’t convert the first time around while remarketing re-engages existing customers through email marketing. At least, this is the traditional way of defining the two strategies but, as Rejoiner explains, “you may hear retargeting tools referred to as remarketing tools”.
You can see this in Google Ads where its standard remarketing feature is classic retargeting – and perhaps it would be less confusing if this was called “standard retargeting”. However, Google’s full set of remarketing tools includes features that allow you to target existing customers and new leads using email lists, which is very much a remarketing feature.
So Google has decided to stick with the collective remarketing phrase for each feature.
How does Google Ads remarketing work?
The basic premise of remarketing is that when a user visits your website, a tracking code (cookies) collects and attributes session data to the user so you can target them with ads after they’ve left your website.
This allows you to deliver ads based on which pages they visited, how long they spent on them or actions they didn’t take – all in the name of creating more relevant, compelling ads.
To achieve this, you need to add the Google Ads tag to your website.
Here are some Google resources that will help you get your website set up for remarketing:
- Setting up remarketing for the first time with the Google Ads tag
- Using the Google Analytics tag in place of the Google Ads tag
- How to tag your site for dynamic remarketing
With your remarketing codes in place, you’re now able to target users with ads based on the actions they take on your website. This opens up a world of potential in terms of who you can target and messages you can use to encourage leads to take the next step along the consumer journey.
Here are some examples of the ways you can target remarketing campaigns:
- Based on the product page visited
- Based on visiting a certain page of your checkout process
- Based on not visiting a certain page (like a “confirmation” or “thank-you” page)
- Time on site
- Number of pages visited
- Demographic targeting
- Geographic targeting
You can use these combinations (and others) to create highly-specific audience lists to target users at every stage of the consumer journey – from first-time visitors to people who keep looking at the same product page but can’t quite bring themselves to complete the purchase.
All you have to do is figure out what users’ actions tell you about their purchase intent and create ad campaigns that will give them the extra little push they need.
How effective is remarketing?
In terms of real numbers, data from WordStream shows that retargeting ads are 76% more likely to be clicked on than a regular display ad. While separate studies find previous visitors who see your remarketing ads are 70% more likely to convert on your website after clicking through.
The key to remarketing campaigns is the relevance of your ads, based on the purchase intent you identify from on-site user actions. With the targeting options at your disposal, you can pinpoint audiences that are most likely to complete the purchase.
For example, users who click through to your website and quickly head back to Google clearly don’t show any real purchase intent. Whereas visitors who spend a lot of time comparing similar product pages are showing a much stronger purchase intent that’s worth pursuing.
Remarketing campaigns allow you to reach these specific audiences and create highly-relevant ads that speak to interest they’ve demonstrated on your website.
This relevance gives you a much stronger chance of turning interest into conversions and you can also use remarketing campaigns to increase your PPC ROI by chasing up clicks that you’ve already paid for.
How much does remarketing cost?
The cost of your remarketing campaigns depends on a lot of variables but, generally speaking, this is among the most cost-effective strategies. Once again, it all comes down to the fact you’re targeting audiences that have already demonstrated an interest in your offer, which means they’re more likely to take profitable action.

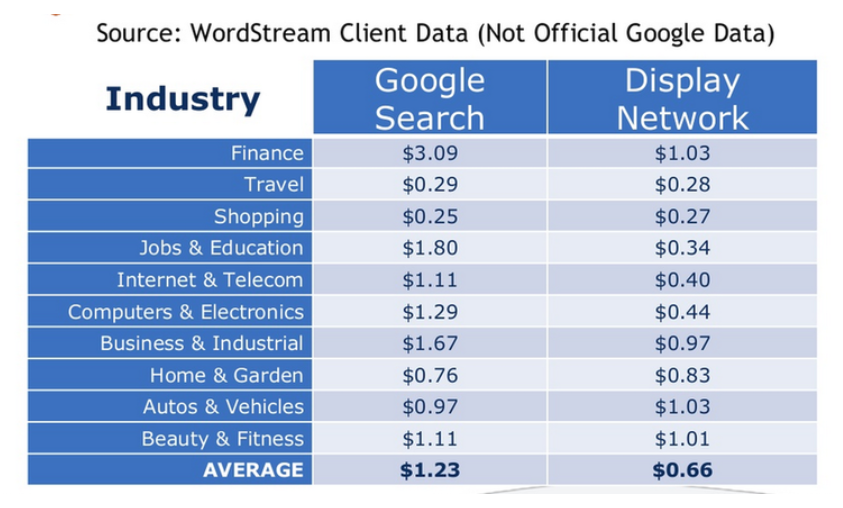
For example, client data from WordStream shows that CPCs for remarketing campaigns on the Display network cost an average of client data from WordStream shows that CPCs for remarketing campaigns on the Display network cost an average of client data from WordStream shows that CPCs for remarketing campaigns on the Display network cost an average of $0.66.66.66 (roughly £0.50) while RLSA campaigns average out at $1.23 (around £0.95).
In both cases, these are about half of the expected average CPCs you would normally see from regular campaigns on the Search and Display networks.
How do I set up a remarketing list?
To create a remarketing list, log in to your Google Ads account, click on the Tools & Settings on the right-hand side of the top navigation menu.
Then, click on the Audience Manger tab at the top of the second-left column that appears in the drop-down menu.
To create a new audience list, click on the blue + icon at the top-left of the dashboard in Audience Manager and you’ll be given five different audience options to choose from:
- Website visitors
- App users
- YouTube users
- Customer list
- Custom combination
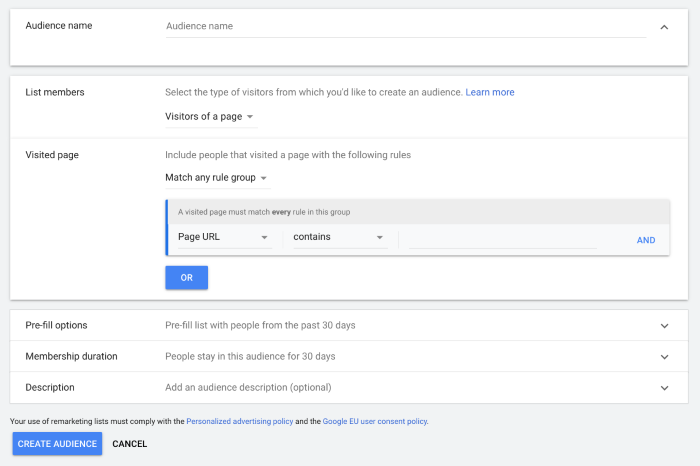
For standard and dynamic remarketing campaigns, click Website visitors and define your audience by filling out this form.
First, name your audience and then define which on-site actions you want to target. For example, you can create a list for visitors who viewed a product page but never visited an order confirmation page – in other words, never made the purchase.
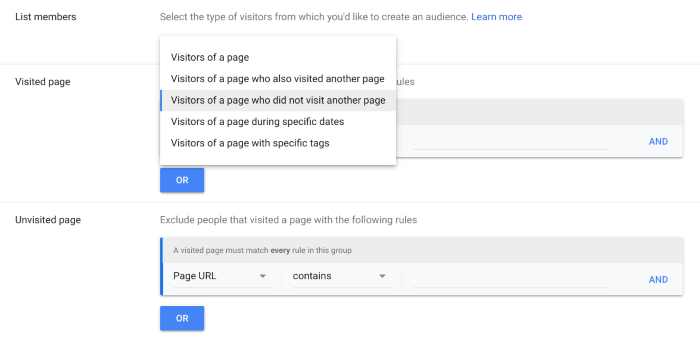
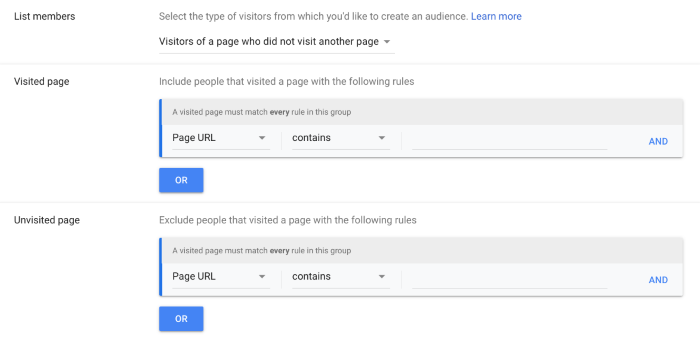
To do this, in the List members tab, select Visitors of a page who did not visit another page. This will bring up two parameter settings, one where you can define the page these users should have visited and another for the unvisited page.
In this case, you’ll define the product page you want to create the campaign for in the Visited page tab and the order confirmation page in the Unvisited page section.
Next, you can choose to pre-fill your list with visitors from the past 30 days who met these criteria or simply start with an empty list that will build from scratch.
In the Membership duration section, you can define how long users stay on your audience list for after completing the desired action. In other words, this determines how long users will continue to see your ads.
You want them to see enough ads to tempt them back to your website but you don’t want to show them so many that they feel like they’re being stalked or bombarded with your ads – something of a balancing act. By default, membership duration is set to 30 days but you can set this to anything from one to 540 days.
Once you’ve set your membership duration, you can add an optional audience description to help you organise your different lists and then all you need to do is hit the Create Audience button to wrap things up.
Now, you’re ready to start targeting previous visitors with highly-relevant remarketing campaigns and bring them back to your site to close the deal.


