Gmail is among the biggest email services in the world. Launched in April 2004, Gmail reached an impressive 1.5 billion monthly active users in 2018.
But as with most professionals, email can be a big time sink and can cause major headaches during the workday. Here are some stats to show the state of email usage in the workplace:
- The average person spends 28 percent of their week reading and responding to email.
- Only 38 percent of the average inbox is considered important and relevant.
- An email interruption requires 64 seconds on average for a person to recover from and return the work.
- Limiting email access can greatly reduce levels of stress.
As you can see, email can hinder productivity and even hurt your health. This is why organizing Gmail for yourself is so important.
The Basics of Gmail: Getting Started
Like most Google products, Gmail is easy to use, but it takes a little time and effort to master. And, like many things in life, your Gmail inbox can get pretty messy if you don’t keep it organized.
There are several components you need to familiarize yourself with to properly organize and sort your Gmail inbox in a way that makes the most sense to you and fits your needs.
Whether you’re in marketing, sales, or customer service, you’re going to need to fully understand how to sort emails in your Gmail account.
Let’s run through some of the basics:
The Gmail Difference
If you’re currently using Microsoft Outlook, IBM Notes, or other email service providers, switching over to Gmail is easy and comes with many benefits.
There are a few notable differences between other email services and Gmail.
Editing and Deleting Messages
When it comes to editing, Gmail has spell check after you compose your message. You can also use cool tools, like the Grammarly Chrome extension, to check spelling in real time as you write your message. The add-on options are endless for Google, thanks to their impressive selection of Chrome extensions built for Gmail.
Another main difference you will notice with Gmail – you have the option to archive messages to declutter your inbox. This is helpful if you don’t want to completely delete a conversation (which you can do by adding it to the trash in your inbox).
Sorting and Organizing Gmail Folders (Using Labels)
This is a game changer, especially if you’re tired of trying to sort messages into single-themed folders of other email services. For example, if you’re a marketer and you’re pitching guest blog post ideas, you would add guest post idea conversations in your “Guest Blogging” email folder.
But what if that conversation also leads to a co-marketing opportunity and you need to put that thread into your “Co-Marketing” folder?
Other services would have you pulling your hair out. But with Gmail, you don’t use folders.
You use labels. And the best part about labels is that you can add multiple labels to conversation threads. So in this example, you could label it as both “Co-Marketing” and “Guest Blogging.”
You can even nest these labels under top level labels to create a hierarchy of topics on the left side of your inbox. So if your guest blogging and co-marketing efforts fall under a bigger theme, such as link building, you can nest those labels under the top level label, “Link Building.”
Additionally, you can color code labels, which makes it easy to see them in your inbox view because they are added next to the subject line.
When you archive a message that is labeled, the message does not show up in your inbox, but it still resides in your label view. This helps declutter your inbox view while staying organized in your individual labels.
Getting to Know the Toolbar Buttons
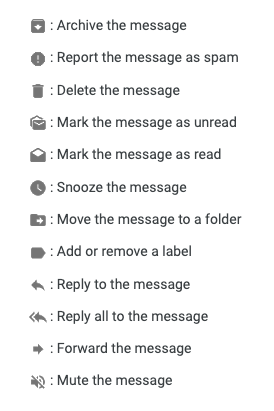
The toolbar at the top of your Gmail includes a lot of different button icons, as you can see here.
These are just a few icons you see when you’re reading a message. Depending on where you are within your Gmail account, you will encounter many other icons.
Here’s a list of what each icon looks like and what they mean, as provided in Google’s Help Center:
When you know what these icons do, you can manage your inbox in no time. Speaking of your inbox…
Gmail: Types of Inbox Layouts
The best part about Gmail is how flexible it is for every user. You don’t need to settle for the default experience. You can tailor mostly every part of your Gmail experience.
One of the most important parts of your experience is your inbox layout. There are five different ways you can lay out your inbox view in Gmail.
1. Default
This is how your Gmail inbox is displayed if you don’t make any adjustments. Your incoming messages are automatically sorted into several different tabs, which you see at the top of your inbox.
This is a great option if you want Gmail to automatically sort your messages as they come in. You can pop into each individual tab as needed and move messages to other tabs if you want.
2. Important First
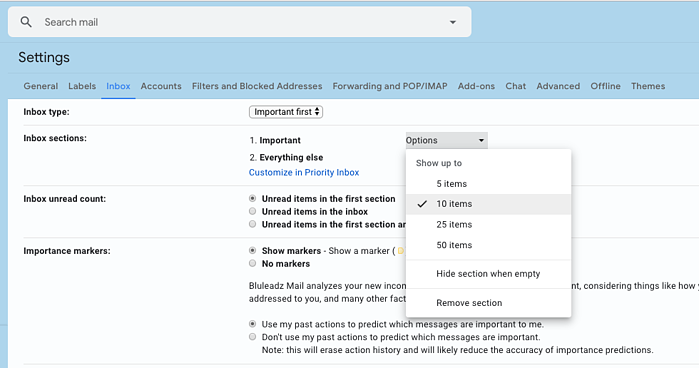
This option is super simple. At the top of your inbox, you will see messages filed under “Important.” Below that section, you will see another section for “Everything Else.”
For example, this is what it looks like when you collapse each of those labels.
You can customize how many messages display for each label. For example, if you only want 10 important messages to populate, select that option in the Settings > Inbox section.
This helps you quickly prioritize messages as they come in, which is a cool productivity hack.
3. Unread First
This is a similar layout to the Important First option. It simply separates your inbox into two sections: “Unread” is at the top, followed by “Everything Else” below that.
4. Starred First
Again, this is the same concept. But this is best if you’re manually starring messages and conversations as important within your inbox. With this layout, those starred conversations are in the top section of the inbox, followed by the “Everything Else” section.
5. Priority Inbox
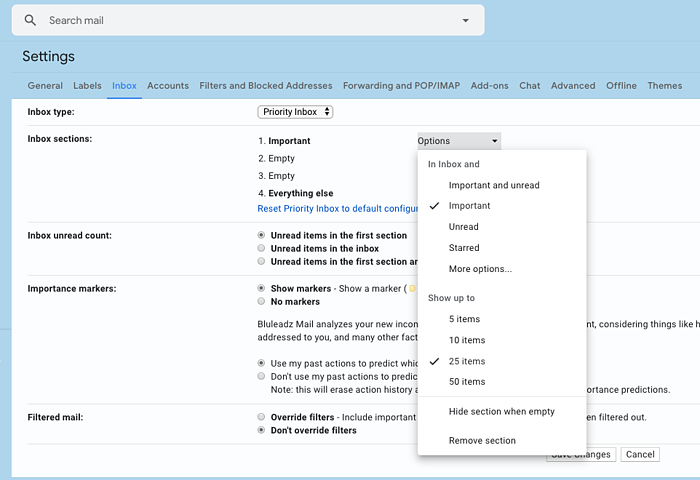
This is how you can break your layout up into multiple sections.
As you can see, you can fully customize each inbox section and dictate how many messages you want to show up. Additionally, you can choose display options for specific labels you created.
Once you have your inbox layout set in a way that best suits your needs, you’re ready to dive into some kick ass Gmail hacks and tips.
Gmail Hacks You Need to Try
Use these hacks to best fit your needs. While the application of these will look different for everyone, it’s important to know how to put these hacks into action.
1. Make Your Labels Pop.
Gmail comes with a few default labels, but people often don’t make their own since they don’t appear to work like ordinary file folders.
As mentioned above, in other email systems, a folder makes messages disappear into their own organizational hierarchy. Labels are a bit different by default, but can also work like folders.
Setting up labels is easy! Click “Create new label” on the left sidebar. After you’ve named your label, you can color-code it by mousing over the label name on the left sidebar and clicking the down arrow that appears. This lets you see color-coded messages at a glance.
For example, I label marketing blog newsletters as “Marketing Wisdom” so I can easily sort them every week. This is how Seth Godin’s blog shows up in my Gmail.
You can see the colored label in the message line.
Unlike Gmail’s tabs, labels don’t make messages “go” anywhere by default. However, you can make them act more like folders if you wish. To do this, access an individual message, and then click on the Folder icon at the top of the screen. In the “Move to” menu, choose a label.
2. Optimize Your Inbox Density Display.
Your interface has a number of display settings to help you organize Gmail according to your needs. The gear icon on the top right of your screen hides the Display Settings feature, which comes with three options: Comfortable, Default, and Compact.
Compact view lets you maximize screen area usage so you can scan over as many messages as possible at one time. The comfortable view shows less messages at once, but it can feel more “comfortable” if you’re the type to feel overwhelmed by seeing a ton of messages within the compact view.
Default shows more information about each message in your inbox. For example, you can see attachments in each message in your inbox before opening it.
3. Star Important Emails.
Gmail does its best to detect which messages and conversations (threads) may be more important to you than others.
It highlights top conversations with the yellow arrow beside the star icon. In theory, this helps you spot the most valuable content in your inbox.
Sadly, Gmail recently changed all the little pointers clarifying why a message was marked important to the unenlightening “important according to our magic sauce.” In reality, the most common triggers for Gmail to auto-mark a message important are these:
- It was sent to you, rather than part of a mass mailing.
- It was sent by someone you correspond with regularly.
- “Important” words are in the header or message text.
- You’ve clicked on and read a particular message a lot.
However, Gmail can still get things wrong. On very rare occasions, it may even mark a phishing email as important. To make it a little bit smarter for you, be sure to tag genuinely important messages yourself – the algorithm will quickly catch on.
Another way to help messages stand out is by starring them.
Stars ⭐️ are used for individual messages in a thread, while the “Important” feature applies to the entire thread. Starring a message that has useful facts, figures, and details can help you find it later. This is great for things like receipts and usernames you might not need again for a long time.
Stars and importance also help you organize Gmail searches more quickly, so they’re worth it.
4. Archive! Don’t Delete.
Each G Suite user can store up to 30 GB of content for free (compared to 15 GB with G Suite free edition or individual consumer accounts). This storage is shared between Gmail, Google Drive, and Google Photos. With so much space, archiving emails usually beats deleting, but what’s the difference?
Deleting gets rid of a conversation forever. Archiving, on the other hand, gets conversations out of your way but leaves them searchable for later, no matter how much time passes.
Plus, as mentioned above, archiving puts labeled messages “away,” out of your inbox but properly sorted into relevant labels.
5. Set Up Desktop Notifications for New Emails.
Marketers, salespeople, and service team members get a lot of emails each and every day. If you prefer real-time engagement with your email correspondence, set up notifications on your desktop. This way, you see them pop up in the top right of your screen.
With that being said, turning on desktop notifications could become annoying and distracting very quickly. However, by following our tip above to mark emails as “Important,” you can turn on desktop notifications for emails only marked as “Important.”
6. Activate “Undo Send.”
Have you ever accidentally sent an email too soon? Sent an email to the wrong recipient? Misspelled the recipient’s name?
The list goes on and on. Fortunately, in Gmail’s settings, you can toggle on an option to “unsend” emails for up to 30 seconds after it’s been sent.
This can be a lifesaver. Instead of going into a panic over a typo or misspelling you catch after hitting “send,” you have between five and 30 seconds (whichever timeframe you prefer) to make some changes and resend it good as new!
7. Create an Email Signature.
This Gmail feature is no secret, but if you’re not using it, you should be!
No matter who you are speaking with your profession, your email signature is the perfect place to include your social media profiles, your company website, and more information that people need to know.
To create or edit your signature, go to Settings, click the “General” tab, and scroll down to “Signature.” Simple as that.
8. Turn On “Nudges.”
Nudges are a great way to be reminded of emails you may have opened and forgot to respond to, or emails you’ve sent that still need a reply. The two options are as follows:
- Suggest emails to reply to: Emails you might have forgotten to respond to will appear at the top of your inbox.
- Suggest emails to follow up on: Sent emails you might need to follow up on will appear at the top of your inbox.
You can turn Nudges on under the “General” tab in your settings.
9. Utilize “Smart Reply.”
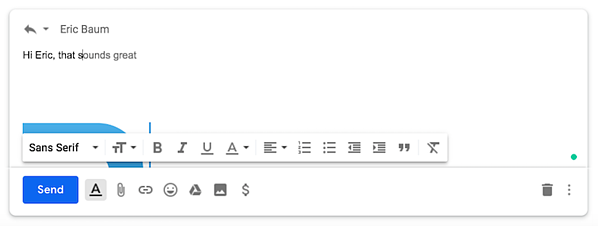
The smart reply feature shows suggested replies and phrases based on the content of the email you received.
By using this feature, you click on the phrase you want to use and either send it as-is or edit the reply before clicking send. You can turn Smart Reply on under the “General” tab in your settings.
This is a big time saver, especially if you just need to fire off a quick message before lunch. Start typing, and Google does the rest!
10. Send or Reply to Emails with Canned Responses.
Do you find yourself sending the same type of email to multiple clients or coworkers? This could be something like scheduling a client or internal meeting or sending a recurring email for blog calendar approval and much more.
You can set up canned responses that allow you to draft and reply to emails with predetermined emails. To enable this feature, go to Settings, click the “Advanced” tab, and enable “Canned Responses (Templates).”
11. Use Automatic Filters.
If you are in a client-facing role, you probably receive many emails from multiple clients each and every day. Also, you probably subscribe to various newsletters and receive task notifications from your project management platform.
In other words, you’re getting bombarded by a ton of different messages consistently, all of which need your attention.
Together, all of these emails can easily consume your inbox, causing you to feel overwhelmed and stressed out. Setting up filters can automatically sort your emails into specific labels.
To set up filters, go to settings and click on the “Filters and Blocked Addresses” tab. From there, follow the prompts to create custom filters of your choice by selecting emails based on the sender, subject line, included or excluded words, or other factors.
Once you choose your filter type, you can also choose an action for Gmail to take each time a message comes into your inbox that matches your filter. Here, you can add your filtered emails to labels, star them, send them directly to spam, or even automatically forward them.
12. Prioritize Your Inbox Using Layout Options.
When you get to the office in the morning and open your email, you probably have a mix of important unread emails, starred emails from previous days, promotional low-priority emails, and more.
This can be overwhelming at first look, but as we covered above, you can structure your layout to ease this burden. Use the following options to best fit your needs:
- Default
- Important first
- Unread first
- Starred first
- Priority first
To prioritize your inbox, go to the “Inbox” tab in your settings and change the Inbox Type.
13. Mute Conversations.
Tired of getting stuck in an email thread between two coworkers that doesn’t really involve you, or between a client and your web developer?
You can open the emails to mark them as read, but the constant new email notification or unread emails in your inbox can drive you crazy. To stop receiving notifications, mute the email thread by clicking the checkbox next to the conversation, click the More menu (•••), and select “Mute.”
Don’t fall victim to the snowball effect of feeling constantly bombarded and overwhelmed by an unsorted inbox. That unread number can explode into the hundreds (and even the thousands) if you don’t prepare.
14. Integrate Google Calendar.
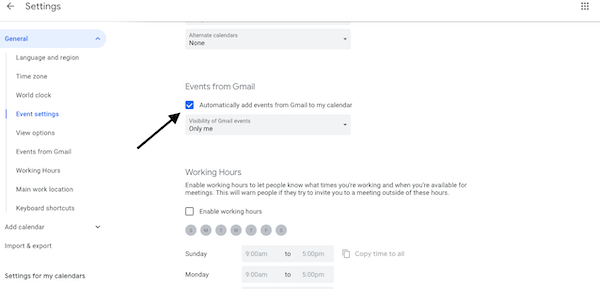
Gmail and Google Calendar are already pre-packaged together. If you want both tools to provide you with even more organization, you can enable the Google Calendar integration that allows you to receive notifications in the upper right hand corner when an email includes an event.
This way, you can add it to your Google Calendar for future notifications. You can also make sure your events from Gmail are automatically added into your Google Calendar.
15. Learn Keyboard Shortcuts.
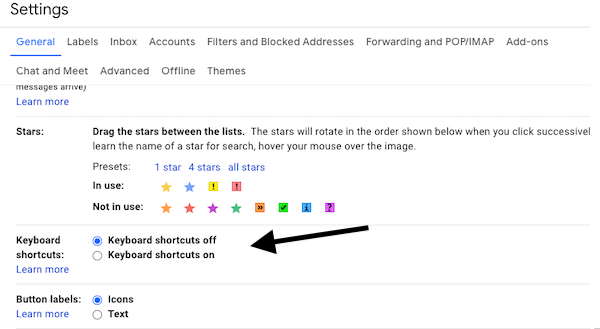
Keyboard shortcuts make it easier for you to label and categorize emails with just a few clicks on your keyboard. When you go to your general settings in Gmail, you can turn on shortcuts.
Some helpful shortcuts you can use include:
- Delete a message: #
- Send emails: CTRL + Enter
- Add an email to a task list: Shift + t
16. Change Your Snippet Display Headings.
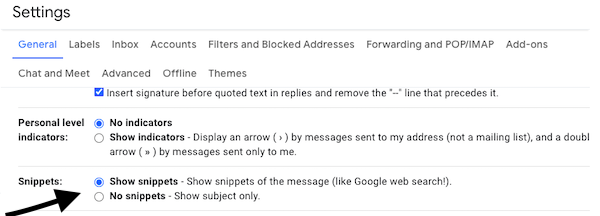
Snippets in Gmail are the small pieces of information you can see in an email before you open it. This may make your inbox seem cluttered.
You can toggle your snippets so you can only see the subject line of your emails to help make your inbox clean and organized.
You can find this toggle in the general settings next to snippets.
17. Categorize Your Tabs.
Gmail has three set tabs in every Gmail account. These tabs or categories are Primary. Social, and Promotions. This helps to keep your inbox clutter-free.
You can add new tabs and customize which emails go into them for further organization. You may add Forums, Updates, and Starred.
18. Enable Hover Actions.
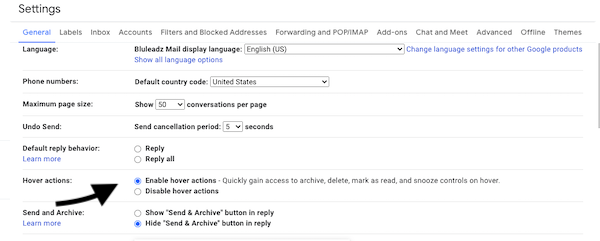
Hover actions help make it easy to mark, archive, delete, and snooze your emails with a single click. You must enable this feature by going to the settings under the General tab. Once you are, there click “Enable hover actions.”
When it is turned on, you can place your cursor over any email and the icons will appear that allow you to mark and categorize the email appropriately.
19. Import Contacts From Other Addresses.
Do you have multiple email addresses? If you do, there is an easy way to get all your contacts from those email addresses into one place. All you have to do is go under Accounts and hit the Imports tab.
This gives you the option to import contacts and emails from accounts you have through Yahoo!, AOL, and Hotmail.
This is a great Gmail organization hack for anyone who has two emails they use for different purposes. You no longer need to switch from one account to another to get contacts or important messages.
20. Customize Your Left Navigation Bar.
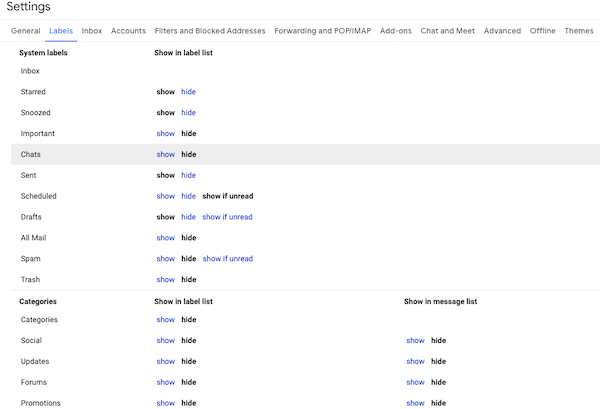
You don’t have to keep the navigation options in the order that Gmail uses as a default. You can customize them by choosing which labels to show and hide on the navigation bar.
If you don’t use some of the options, it may be a good idea to hide them to help de-clutter your menu bar. Go to your settings and hit the Labels tab.
A list of labels pop up with options for show and hide. The label is highlighted in blue if you are currently using that specific menu label.
Reclaim Your Gmail Inbox Right Now
The power of Gmail is impressive, and by learning these basics and putting these hacks into action, you’re well equipped to sort your Gmail inbox to streamline your email usage and keep you productive every day.
Read more:
